Terracotta Tile Cleaning

Welcome to my Work History archive where you will find detailed examples of the cleaning and renovation of Terracotta tiles carried out in Oxfordshire

Cleaning and Renovating Terracotta Tiles

Terracotta tiles have been around in certain parts of the world for over two millennia, in fact the word Terracotta means burned earth. The ancient Romans used a variety of terracotta tiles in their villas and palaces for many centuries. Terracotta tiles are thicker than most modern tiles giving them strength and durability.

The one big downside to Terracotta is the fact that it has no glaze on the surface and being very porous can soon pick up and store muck and dirt very quickly. If you have ever owned a Terracotta floor before you will be able to relate to this problem however the answer is to ensure you have the correct sealer in place.

Traditionally Wax was used to protect terracotta tiles however with the advent of modern purpose made sealers we don’t recommend it. Not only is it troublesome to remove but it scratches easily and we have seen situations in kitchens where dirt and oil trapped in the wax turns black and becomes very unsightly.

For sealing Terracotta we actually recommend Tile Doctor Seal and Go which works well on clay tiles such as Terracotta and is also water based so doesn’t give off a smell as it dries. When applying a sealer always make sure the floor is dry first as applying a sealer to a damp floor can lead to inconsistent results. Because of this we typically clean and seal Terracotta floors over two days so we can clean on day one and then apply the sealer on day two having let the floor dry off overnight.

Below you will find detailed examples of work we have carried out in the past, it should give you some idea of what’s involved and what can be achieved with the right techniques and products.


Terracotta Floor Before After Cleaning in Abingdon

Terracotta Kitchen Floor Deep Cleaned and Sealed in Abingdon

The photos below are from a customer in Abingdon who had a Terracotta tiled floor in their Kitchen. Kitchens are high traffic areas and overtime the sealer had worn off and now dirt was becoming ingrained in the pores of the Terracotta. Once you get dirt in the pores of a clay tile or natural stone it becomes very difficult to remove and now the floor was not looking its best.

Terracotta Tiled Floor Before Cleaning Abingdon

Unhappy with the appearance of the tiles the owner of the property had been in touch requesting a deep clean and fresh sealer. It was a fairly straight forward job and I was able to provide a quick quotation which was accepted and a data agreed to do the work which would take two days.

Cleaning Terracotta Tile

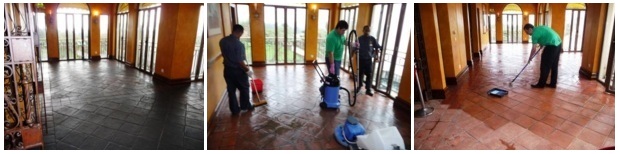
I started cleaning the Terracotta by doing applying a 1:3 dilution of Tile Doctor Pro-Clean which is our goto alkaline tile cleaner. For this floor I actually ended up using two litres of Pro-Clean diluted in six litres of water. The solution is left to soak into the tile for about ten minutes before being scrubbed in using a 180-grit silicon carbide brush attached to a weighted floor scrubber. These brushes are quite expensive however they do last a long time so well worth the investment for someone in my profession. If you were doing this work yourself a Black Buffing pad would do the trick.

This process worked well on the floor and the cleaning solution was soon dirty with the soil that had been released from the pores of the Terracotta tile. The slurry was rinsed off the floor with water and extracted using Numatic wet vacuum.

Final step of the cleaning process was to give the tiles an acid wash. This is done using a 10:1 dilution of Tile Doctor Grout Clean-Up which is applied to the tiles and then scrubbed in using a soft poly brush fitted to a floor scrubber. This process removes any old grout smears and traces of efflorescence and slightly roughens the surface of the Terracotta tile to ensure a better bond with the sealer. Once done the floor was rinsed with more water and extracted with the wet vacuum leaving the floor as dry as possible before leaving for the day.

Sealing Terracotta Tile

I left the floor to dry off overnight and I returned the next day to seal the floor first checking the tiles were dry by taking a few moisture readings with a damp meter. The readings came back fine so I need not have been concerned however Terracotta tiles being made from clay are very porous so it’s always a good idea to check.

The floor was dry, so I set about applying the first coat of sealer which for this floor I used Tile Doctor Seal and Go Extra. You need to leave around thirty minutes in-between coats and this floor took five coats before it was fully sealed.

Terracotta Tiled Floor After Cleaning Abingdon

Once finished the Terracotta floor looked much cleaner, fresher and the sealer had given the tiles a nice subtle sheen. For aftercare I recommend Tile Doctor Neutral Cleaner which is ideal for the regular cleaning of sealed floors.


Terracotta Floor Deep Cleaned and Sealed in Oxfordshire

Terracotta Kitchen Floor Deep Cleaned and Sealed in Abingdon Read More »

Terracotta Tiled Floor Before After Renovation Witney

Cleaning and Sealing a Terracotta Tiled Floor in Witney

I was called in by a client from the Cotswolds market town of Witney who had lifted up a carpet to discover a Terracotta tiled floor underneath. Although the floor was in good physical condition the carpet and underlay had been trapping moisture resulting in White efflorescence staining. Old floors like this one were laid before damp proof membranes became standard so covering them up can cause damp issues. It is important to allow moisture from underneath tiled floors to evaporate unimpeded otherwise moisture can reach out to the walls resulting in rising damp.

Terracotta Floor Before Cleaning Witney
Moisture can also penetrate the pores of the clay Terracotta tile potentially leading to its degradation over time and in this case resulted in the appearance of white efflorescent salts being deposited on the tile surface causing unsightly staining.

Cleaning Terracotta Tile

I started cleaning the Terracotta by doing applying strong dilution of Tile Doctor Pro-Clean which is an effective alkaline tile cleaner. For best results I spread the solution on the floor and then leave it to dwell and soak in for up to twenty minutes. This gives the product time to eat into the dirt and old coatings before being scrubbed in with a black pad fitted to a rotary floor machine. This worked very well on the floor and the cleaning solution was soon dirty with the released soil which was removed using a wet vacuum and more water to rinse it away and dry the floor as much as possible.

To remove the white efflorescent staining the floor was given an acid wash using Tile Doctor Grout Clean-up which is designed for removing grout and other mineral stains from tiling. This was brushed into the tile and grout by hand and left to fizz as it reacted with the efflorescence. After another rinse and extract with the wet vacuum the floor was left to dry out for a couple of days. The next step would be to seal the Terracotta and for best results the tile needs to be dry.

Sealing Terracotta Tile

On my return I checked the tiles were dry by taking a few moisture readings with a damp meter. The readings came back fine so I need not have been concerned however Terracotta tiles being made from clay are very porous so its always a good idea to check.

Given the previous issues with damp I knew I would need to use a fully breathable sealer, so I opted to use Tile Doctor Colour Grow. This product will cope well with the moisture and contains a colour enhancing formula that really brings out the red colour of the Terracotta.

Terracotta Floor After Cleaning Witney
Except for a few deep efflorescent stains in the grout, the floor responded very well to the treatment and made a massive improvement to the overall appearance. My client was pleased with the transformation and the newly restored floor matched well with the character of the property.


Terracotta Floor Cleaned and Sealed in the Cotswolds

Cleaning and Sealing a Terracotta Tiled Floor in Witney Read More »

Grubby Terracotta and Slate Conservatory Floor Bicester After Cleaning

Restoring a Terracotta and Slate Tiled Conservatory in Bicester

I was recently contacted by a client living in the historic market centre of Bicester, one of the fastest growing towns in Oxfordshire. Many will know Bicester for its famous shopping village.

They had a small, dirty Terracotta and Slate tiled conservatory which had suffered from water damage and a loss of colour. Terracotta and Slate are examples of naturally porous tiles which can suffer from dirt becoming trapped/ingrained into its pores making it difficult to clean for the regular homeowner with everyday cleaning products. The water damage had also left stubborn stains on the floor which would require professional attention to remove.

Grubby Terracotta and Slate Conservatory Floor Bicester Before Cleaning

Cleaning a Terracotta and Slate tiled floor

My first task was to cover the whole floor with Tile Doctor Remove & Go, mixed with water to form a solution. Remove & Go is a powerful cleaner that needs to be left to dwell for roughly ten minutes when first applied. This allows the product to soak into the pores of the stone, thereby getting underneath dirt and lift it out. After allowing the solution to dwell, I then agitated the surface with a brush attached to a floor machine to remove the particularly difficult muck.

In this process of doing this, I unveiled some staining in the floor. To tackle this I used NanoTech HBU (previously known as Ultra Clean), which uses nano-sized particles to remove heavy soil build-up in places other products simply cannot reach.

Following this I repeated the cleaning process with Remove & Go until I was satisfied that the conservatory floor had been cleaned to the best of my abilities. All of the resulting soiled residue was quickly extracted using a wet-vac machine. The floor was then given a final rinse before leaving to dry completely overnight before returning the next day to seal the tiles.

Sealing a Terracotta and Slate tiled floor

On day two and after checking the floor had dried, I applied several coatings of Tile Doctor Seal & Go to seal the floor. This helped to restore the desired colourful sheen finish to the floor, whilst also guaranteeing durable surface protection for the future. Seal & Go is suitable for use on internal, unsealed porous surfaces such as Terracotta, Sandstone, Slate, and more.

Grubby Terracotta and Slate Conservatory Floor Bicester After Cleaning
My client was very pleased with the results. They were especially happy to see the fantastic natural colours and shades in the tiles brought to life again, after forgetting they were there to begin with!

Cleaning and sealing Terracotta and Slate tiles in a conservatory in Bicester

Restoring a Terracotta and Slate Tiled Conservatory in Bicester Read More »

Terracotta Tiled Floor After Cleaning Oxford

Cleaning and Sealing a Terracotta Tiled Floor in Oxford

The before picture below was actually taken after another cleaning company had come in to clean these Terracotta floor tiles for a client in the city of Oxford; well what can I say except they then called Tile Doctor.

Terracotta Tiled Floor Before Cleaning Oxford

Cleaning Terracotta Tile

I started by doing a test on a small area and realised that I could strip the remaining sealer from the floor with a strong dilution of Tile Doctor Pro Clean which is also an effective cleaner and safe to use on stone and tiled floors. So I diluted Pro Clean with warm water and spread this on the floor leaving it to dwell for twenty minutes before scrubbing it in with a black padf fitted to my Rocky floor machine. This worked very well on the floor and the cleaning solution was soon dirty with the released soil which was removed using a wet vacuum and more water to rinse it away and dry the floor as much as possible.

Sealing Terracotta Tile

Satisfied that the floor was now as clean as it could be I left for the day and returned the next day to seal the floor, first checking that the tiles were dry and ready to be sealed.

Sealing was done in two stages starting with an initial coat of Tile Doctor Colour Grow which is an impregnating sealer that adds life to the natural colours in the tiles and gives the floor a good base for the next sealer. The second stage was to apply a few coats of Tile Doctor Seal & Go which builds up a surface seal that leaves a nice sheen to the floor as requested by the customer.

Terracotta Tiled Floor After Cleaning Oxford
 

Terracotta Floor Cleaned and Sealed in Oxfordshire

Cleaning and Sealing a Terracotta Tiled Floor in Oxford Read More »

Terracotta Tiled Floor in Great Bourton After Cleaning

Terracotta Tiled Floor Cleaned and Sealed in Great Bourton

At first glance and this Terracotta tiled floor at a house in the village of Great Bourton looks in good condition, but on closer inspection there were visible white marks where there had been a water leak in previous years and the salts had come through the tiles. The customer also told me she had to wax the floor on a regular basis and was looking for a seal where she didn’t have to do this.

Terracotta Tiled Floor in Great Bourton Before Cleaning 1 Terracotta Tiled Floor in Great Bourton Before Cleaning 2

Cleaning Terracotta Tile

My first task was to protect all the skirting and kickboards with protective tape. I then mixed Tile Doctor Pro Clean with water and spread it over a section of the floor and then left it to dwell for a few minutes. The solution was then scrubbed in with a black pad on a 17inch rotary floor scrubbing machine. I then used a wet vacuum to remove the slurry and rinsed the floor with water. This process was repeated this process until the whole floor was scrubbed and rinsed with any stubborn areas re-treated.

To remove the white salts from the Terracotta I applied Tile Doctor Grout Clean Up over the floor which was scrubbed in and then removed using the wet vacuum. The whole floor was then thoroughly rinsed with water and the wet vacuum used to suck up the water until it the surface was dry.

The photograph below shows the terracotta floor at this stage with the floor clean and stripped back before re-sealing. I left the floor a couple of days at this point to allow it fully dry before applying the sealer.

Terracotta Tiled Floor in Great Bourton After Stripping

Sealing Terracotta Tile

On my return I checked the floor had dried and then applied two coats of Tile Doctor Colour Grow which is an impregnating seal that enhances the natural colour of terracotta, I then added five coats of Tile Doctor Seal and Go which is a topical sealer giving it the nice finish the customer required.

The customer was really pleased with the results and also relieved that she would not have to keep waxing the floor; whilst I was there I demonstrated how to clean the floor using Tile Doctor Neutral cleaner which unlike acidic cleaners will not harm the sealer.

Terracotta Tiled Floor in Great Bourton After Cleaning 1 Terracotta Tiled Floor in Great Bourton After Cleaning 2

The floor looks much better and certainly my customer thought so and left the following feedback on the system.

Very pleasant young man and he has done a great job. The kitchen floor is transformed. Thank you Barry!

Terracotta Floor Cleaned and Sealed in Oxfordshire

Terracotta Tiled Floor Cleaned and Sealed in Great Bourton Read More »

Terracotta Tiled Floor Thame After Cleaning and Sealing

Terracotta Tiled Kitchen Floor Cleaned and Sealed in Thame

This customer had recently moved into a house with a Terracotta Tiled Floor in Thame, Oxfordshire and decided she did not like the colour of the floor grout and also was unable to clean off some back marks in the corners. When I went to view the property I performed a test clean on a sample area to show her that the black marks could be removed and also stripped back the tile show how much cleaner they could look. The work was agreed and I was booked to come back and completely strip the floor tile, reseal it and also change the grout colour.

Terracotta Tiled Floor Thame Before Cleaning

Cleaning Terracotta Tile

On the first day I carefully taped up all the kitchen cupboards and skirting board to protect them from any splashes or damage. Once this was done a strong dilution of Tile Doctor Pro-Clean which is a multi-purpose cleaner and stripper was applied to the Terracotta floor tiles and left to soak into the tile for a while before being worked in with a rotary machine fitted with a black stripping pad and then a floor scrubber.

Once the whole floor had been treated in this manner the now soiled Pro-Clean solution was removed from the floor using a wet vacuum and then the floor rinsed with clean water using a spinner tool attached to the wet vacuum. The spinner tool has been a great investment for us, it applies water under pressure to the floor and at the same time removes it via an adjacent suction connection saving loads of time; it’s also a versatile tool that can also be used for Carpet Cleaning which incidentally we also do.

The Terracotta tile was now stripped of all sealer so the next step was to cleaned the black grout with Grout Clean Up which is a mild acid cleaner that can remedy a number of grout related issues, after this I rinsed the floor again with fresh water. At this point I noticed some of the grout joints had loose or missing grout so the loose grout was removed and new grout applied to the affected areas, I then had to wait overnight so the floor could dry.

Sealing Terracotta Tile

On the second day I set about sealing the floor using two coats of Tile Doctor Colour Grow which as well as protecting the floor also brings out the natural colours in the Terracotta tile. For added protection and to enhance the shine on the floor I then applied a further five coats of Tile Doctor Seal and Go, the combination of the two compatible sealers provided the effect the customer wanted. I then had to wait overnight for the sealer to dry hard.

Grout Colouring

If you recall from the start of this post, the customer also wanted to change the grout colour to a light grey so I came back for a third day to complete this. With the original grout colour being black I was concerned that the dark grout may show through the lighter grey and so I first let the customer know that it might take two coats of Grout Colourant to achieve this. However once I got started colouring the grout using an applicator I noticed that the light grey was consistently covering the black grout and therefore one coat would be sufficient.

Terracotta Tiled Floor Thame After Cleaning and Sealing
When I had finished she was very impressed by the colour of the tile and grout and remarked on how much brighter her kitchen looked. She also asked me to come back later to do the hall floor which is a multi coloured Victorian floor.

Terracotta Floor Cleaned and Sealed in Oxfordshire

Terracotta Tiled Kitchen Floor Cleaned and Sealed in Thame Read More »

Terracotta Tiles Henley On Thames After

Terracotta Tiled Floor Cleaned and Sealed in Henley on Thames

Another Terracotta tiled floor installed in a conservatory this time in Henley on Thames. The previous sealer was mostly worn away and was no longer offering much protection allowing dirt to get ingrained into the tile and making it difficult to clean effectively resulting in dull looking tile and grout.

Terracotta Tiles Henley On Thames Before

Cleaning Terracotta Tile

I first covered the floor with a mixture of Tile Doctor Pro Clean and water which was scrubbed in with a black scrubbing pad fitted to a slow speed floor scrubber; the soiled solution was removed using a wet vacuum and floor was rinsed down with clean water until all the chemicals were removed again using a wet vacuum to remove the liquids. The process was repeated a number of times until we were happy the tile and grout was clean and took most of the day.

Sealing Terracotta Tile

I left the floor to dry overnight and came back the next day to seal it checking with a moisture meter first to ensure the floor had dried. Terracotta is very porous so in the end it tool eight coats of Tile Doctor Seal and Go to seal the floor, Seal and Go is a water based sealer so it doesn’t give off an odour when it’s drying and also offers durable stain protection together with a low sheen finish.

Terracotta Tiles Henley On Thames After
The floor has been much improved certainly the customer was very pleased with the result.

Terracotta Floor Cleaned and Sealed in Oxfordshire

Terracotta Tiled Floor Cleaned and Sealed in Henley on Thames Read More »

Patchy Terracotta Tiles After Cleaning and Resealing

Terracotta Tiled Kitchen Floor Cleaned and Sealed in Kidlington

I was asked to look at a Terracotta tiled kitchen floor that had just be fitted at a house in Kidlington, it seems the tiles were sticky and patchy and basically looked a bit of a mess. The home owner phoned me on Thursday sounding really upset and as I’m based in the general area I was able to look at the floor later that day.

On inspection I could see that the recently applied sealer had not taken to the floor probably as it was not been allowed to dry properly before sealing. We didn’t know what had been applied on the floor so I did a test on a couple of tiles to see which products would work best to strip the sealer off and then booked the job in for the following Saturday.

Patchy Terracotta Tiles Before

Cleaning Terracotta Tile

I placed my dust sheets down were needed and then I started on the floor by wetting it with a strong dilution of Tile Doctor Pro-clean, this product is quite versatile and being alkaline is safe to use on tile, stone and grout. The floor was then scrubbed using a rotary machine fitted with a black scrubbing pad to agitate and then rinsed down with clean water which was then removed using a wet vacuum and the floor left to dry. This process was repeated until I was satisfied that all the sealer was off and then give the Terracotta a thorough and final rinse to neutralise the floor and make sure there was no chemicals were left on the tile, again a wet vacuum was used to remove the water and I also asked the customer to leave the front and back windows open so the air flow would help dry the floor quicker.

Sealing Terracotta Tile

After a couple of hours I tested the floor with a Damp Meter to confirm the floor had dried and began to seal the tiles using Tile Doctor Seal and Go sealer which is an ideal sealer for Terracotta and also provides the satin finish the customer wanted.

Patchy Terracotta Tiles After Cleaning and Resealing
The area wasn’t the large so I managed to complete the whole Job in one day, needless to say the owner was very pleased that I was able to restore her new floor and oven the moon with the services given only three days had elapsed from the first point of contact to completion.

Patchy Terracotta Tiled Floor Cleaned and Sealed in Oxfordshire

Terracotta Tiled Kitchen Floor Cleaned and Sealed in Kidlington Read More »

Abused Terracotta Conservatory Tiled Floor Kidlington After

Terracotta Tiled Conservatory Floor Cleaned and Sealed in Kidlington

This Terracotta tiled floor installed in a conservatory in Kidlington Oxfordshire was in the worst condition I have ever seen, you should be able to make out a large amount of stains quite easily yourself in the photograph below. The conservatory had been used as a greenhouse with many plant pots sitting directly on the tile which over the years had led to the staining and a build-up of white salts on the surface.

Abused Terracotta Conservatory Tiled Floor Kidlington Before

Cleaning Terracotta Tile

My first step was to give it a good hoover to remove any loose detritus; I then covered the floor in a dilution of Tile Doctor Pro Clean which was left to soak into the Terracotta tile for a few minutes. Pro-Clean I should add is a heavy duty alkaline cleaning product designed for cleaning tile, stone and grout. The next step was to scrub the floor with a black scrubbing pad fitted to a rotary machine; after the scrubbing was done I rinsed with water and removed the waste with a wet vacuum. I then repeated the process again tackling the grout this time with a stiff brush before thoroughly rinsing with a high pressure spinner tool to totally flush the floor. The next step was to rinse the floor with Grout Clean Up which is an acid wash to remove all the salts in the floor, after that I rinsed the floor with the spinner tool again.

Sealing Terracotta Tile

I left the floor to dry overnight and the next day came back to do the sealing taking care to use a moisture meter of the floor first to ensure it had dried sufficiently . I used Tile Doctor Seal and Go to seal the floor, it’s a water based sealer so it doesn’t give off an odour when it’s drying and also offers durable stain protection together with a low sheen finish. It’s also a breathable sealer which will allow moisture to rise up through the floor and evaporate on the surface rather than trapping it beneath the seal.

Abused Terracotta Conservatory Tiled Floor Kidlington After
The floor was transformed by this process and I think you will agree this is confirmed by the before and after photographs above which really speak for themselves.

Terracotta Floor Cleaned and Sealed in Oxfordshire

Terracotta Tiled Conservatory Floor Cleaned and Sealed in Kidlington Read More »

=================================

Oxfordshire Tile Doctor

================================= Read More »

Scroll to Top