Porcelain Tile Cleaning

Welcome to my Work History archive where you will find detailed examples of the cleaning and renovation of Porcelain tiles carried out in Oxfordshire

Cleaning and Polishing Porcelain tiles

Harder than ceramic tiles modern production methods have allowed a growth in the availability and design of Porcelain tiles which are known for their durability and water resistance making them a popular option for floors. Like Ceramic, Porcelain tiles are generally very easy to clean and need little maintenance however some are micro porous and do require sealing, you will need to ask you supplier which type you have installed as it can be very difficult to tell.

If your Porcelain tiles are of the micro porous variety then they will need to be sealed to avoid a build-up of dirt in the pores of the tile. For this we recommend Tile Doctor Ultra-Seal which works by impregnating the pores to ensure dirt can’t become ingrained there without changing the appearance of the tile itself.

Apart from sealing the biggest issues with this type of tile are usually grout related. Either the adjacent grout discolours over time or the tiler has been unable to remove excess grout from the surface of the tile, an issue known as Grout Haze or Grout Smears. Modern grouts can be particularly susceptible to the grout haze issue due to shorter working times and polymers in the grout which make it difficult to remove once dry. If this sounds familiar do contact us so we can advise you on how best to remove it.

Below you will find detailed examples of work we have carried out in the past, it should give you some idea of what’s involved and what can be achieved with the right techniques and products.


Cream Porcelain Tiles Before After Epoxy Grout Removal Banbury

Epoxy Grout Removal Porcelain Tiles, Banbury

Detailed below is a great example of why Tile Doctor uses the slogan:

“We Love the Jobs Tilers Hate”

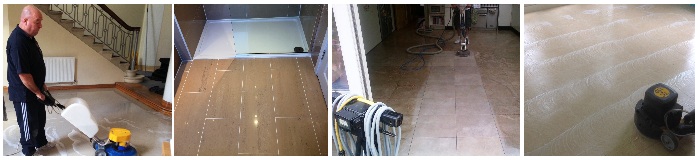
First of all, apologies for the photographs, at this time of year it is tricky to get good pictures when the natural light is poor. If you look closely however you should recognise what is essentially a new installation of Cream Porcelain floor tiles. The work was done at a house in Banbury which is a market town in Oxfordshire. Banbury is a significant commercial and retail centre for the surrounding area of north Oxfordshire and southern rural parts of Warwickshire and Northamptonshire.

Epoxy Grout Before Removal From Porcelain Tiles Banbury

The tiler who laid the floor had used an epoxy grout and unfortunately had not polished off the grout quickly enough after grouting and it was now ruining the appearance of the floor. He now found it impossible to remove the excess residue and was unable to offer a solution leaving the problem to the customer to sort out. Fortunately, the client found Tile Doctor and having visited the property to survey the floor and assess the correct procedure required to renovate the tiles. Epoxy grout is a superior product to cement based grout and very resistant to staining however it is trickier to work with and often causes problems. We have come across this problem before however so I knew how to treat it and assured the client it could be resolved.

Removing Epoxy Grout from Porcelain Tiles

The first process was to apply a specialist epoxy grout remover then mix in Tile Doctor Acid Gel, I then scrubbed the resulting solution with a black pad fitted to a rotary machine running at a very slow speed to reduce splashing. The Tile Doctor Acid Gel has a unique pH1 blend of Phosphoric and Hydrochloric acids in a gel form and is perfect for treating grout haze.

The floor was then rinsed with water to remove the soil which was then extracted with a wet vacuum. It was a slow process and I worked in sections until the whole floor was clear. There was still some residue in the grout, so I washed the floor with a medium dilution of Tile Doctor Pro-Clean and scrubbed it into the floor using a medium brush fitted on my rotary machine.

Last step was to give the whole floor a thorough rinse with water, again using the wet vacuum to remove the water and get the floor as dry as possible. The process took about six hours and when I was finished the Porcelain tiles looked much better. There was no need to add any sealant to this floor as this particular make of Porcelain are not porous and won’t accept it.

Epoxy Grout Removed From Porcelain Tiles Banbury

The client was very relieved to see the floor looking as good as new, it was how the floor should have looked following installation.


Professional Restoration of a Porcelain Tiled Kitchen in Oxfordshire

Epoxy Grout Removal Porcelain Tiles, Banbury Read More »

Porcelain Shower Before After Renovation in Didcot

Mould-Covered Porcelain Shower Tiles Refreshed in Didcot

Available in a variety of styles and designs Porcelain tiles are harder than normal Ceramic tiles and are known for their durability and water resistance, making them ideal for use in shower cubicles and bathrooms.

However, as I’m sure most people already know, shower tiles are not the easiest to keep clean and fresh. These tiles are exposed daily to a multitude of acidic soaps and shampoo dyes, and if proper precaution is not taken to rinse away the excess after using the shower, mould will grow very quickly on the grout.

This shower cubicle, constructed from Porcelain tiles, is a typical example of this. As you can see from the photo below, the mould problem was very apparent. I was asked by the property owner, who lives in Didcot, a railway town in South Oxfordshire, to refresh it after what must have been years of neglect. Here’s how I did it.

Porcelain Shower Before Renovation in Didcot

Cleaning a Porcelain Tiled Shower Cubicle

The first process in restoring this shower cubicle was to spray the walls with Tile Doctor Duo Clean, which is both a grout cleaner and a mould remover. I left it to dwell for 45 minutes, before proceeding to scrubbing into the grout with a stiff brush. I worked in sections, spraying more Duo Clean onto the tiles as I moved along the length of the walls.

Following this, I rinsed the entire cubicle with fresh water to remove any traces of chemicals and used my wet-vac machine to dry it quickly. The next process was to remove the old, mouldy silicone and replace it with fresh silicone.

Sealing a Porcelain Tiled Shower Cubicle

With the shower cubicle now fresh and clean, it was now time for me to seal the grout and tiles.

I did this using Tile Doctor Wall Grout Sealer Spray, which is a water-based grout sealer that prevents oil, water and acid-based contaminants – including soaps and shampoos – from spoiling the appearance and colour of grout. It does this while allowing for moisture vapour transmission.

Check out the photo below – you can see that after a short day’s work, the appearance of the cubicle has been completely transformed. The customer was very pleased with the result and the addition of the sealer will ensure it stays this way for some time to come.

Porcelain Shower After Renovation in Didcot
 

Professional Porcelain Tiled Shower Cubicle Renovation in Didcot

Mould-Covered Porcelain Shower Tiles Refreshed in Didcot Read More »

=================================

Oxfordshire Tile Doctor

================================= Read More »

Scroll to Top